Introduction:
How to operate CNC laser cutting machine? If you are new to this field, you will have this doubt. The laser cutting machine should follow specific operating procedures to improve work efficiency and reduce work hazards and wear and tear. Here is a guide on how to operate CNC laser cutting machine.
How to operate CNC laser cutting machine?
1. Safety Precautions:
How to operate CNC laser cutting machine? Before getting into this topic, let’s talk about safety precautions. Operating a CNC laser cutting machine requires strict adherence to safety precautions to prevent accidents and ensure the well-being of operators.
Here are some essential safety measures to follow:
-
Training and Familiarization
1) Obtain proper training on the operation of the specific CNC laser cutting machine you will be using.
2) Understand the machine’s user manual and any safety guidelines provided by the manufacturer.
3) Familiarize yourself with the machine’s controls, emergency stop buttons, and safety features.
-
Personal Protective Equipment (PPE)
Wear appropriate personal protective equipment, including safety glasses or goggles, gloves, and protective clothing.
-
Machine Setup and Maintenance
1) Before starting the machine, inspect it for any damaged or worn parts. Do not operate a machine in need of repair.
2) Keep the working area clean and free of clutter. Remove any unnecessary materials or debris that could interfere with the machine’s operation.

-
Material Handling
1) Use proper lifting techniques when handling heavy materials.
2) Ensure that the materials being cut are properly secured or clamped to prevent movement during the cutting process.
3) Avoid touching the material or standing directly in front of the laser beam while the machine is cutting.
-
Fire Safety
Keep a fire extinguisher nearby and ensure you are familiar with its operation. Implement fire prevention measures, such as keeping flammable materials away from the machine and maintaining a clean work area.
-
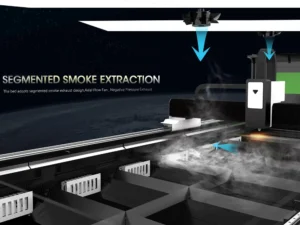
Ventilation and Fume Extraction
Ensure that the machine is properly ventilated to prevent the accumulation of hazardous fumes and gases. Follow proper fume extraction procedures to maintain air quality and minimize the risk of respiratory issues.
-
Emergency Procedures
Know the location of emergency stop buttons and how to shut down the machine quickly in emergencies.
Understand the evacuation procedures and emergency contact information for your workspace.
2. Power Up the Machine:
How to operate CNC laser cutting machine? To safely power up a CNC laser cutting machine, follow these general steps:
-
Pre-Check
1) Ensure that the machine and the surrounding area are clean and free of any obstructions.
2) Ensure the machine is securely grounded and the power supply is properly connected.
3) Check the emergency stop button and make sure it is in the released position.
-
Power On Procedure
1) Locate the main power switch on the machine’s control panel or nearby.
2) Verify that the main power switch is in the “Off” or “0” position before proceeding.
3) Turn on the power supply to the machine by flipping the main power switch to the “On” or “1” position.
-
Machine Initialization
Depending on the specific machine, you may need to initialize or boot up the CNC control system. Refer to the machine’s user manual for specific instructions.

-
Safety Checks
Ensure that all safety features, such as interlocks and emergency stop buttons, are in proper working condition. Confirm that the machine is in a safe state and ready for operation.
-
Homing and Calibration
If necessary, perform homing or reference point procedures to establish the machine’s initial position. Calibrate the machine by following the manufacturer’s guidelines to ensure accurate cutting and positioning.
-
Monitor Display and Status
Check the machine’s display or control panel for any error messages or abnormal indications. Verify that all system components, such as laser, gas supply, and ventilation, are functioning properly.
Always refer to the machine’s user manual and follow the manufacturer’s instructions for detailed guidance on powering up and operating your particular machine model.
3. Material Setup:
To properly set up materials for operation on a CNC laser cutting machine, follow these steps:
-
Material Preparation
Ensure that the material is clean, free from dirt, debris, or any contaminants that could affect the cutting process or quality. If necessary, remove any protective coatings, stickers, or films from the material.
-
Material Positioning
1) Place the material on the machine’s cutting bed or work table. Ensure it is aligned correctly according to your desired cutting layout or program.
2) Secure the material in place using clamps, magnets, or other appropriate methods to prevent movement during cutting.
-
Focus Adjustment
If your CNC laser cutting machine utilizes adjustable laser focus, set the focus distance according to the material thickness. Refer to the machine’s user manual or specific guidelines for focus adjustment procedures.
-
Program Setup
1) Use appropriate CNC control software or programming tools to create or import the cutting program or design.
2) Set the correct cutting parameters such as laser power, cutting speed, assist gas (if applicable), and any other relevant parameters based on the material and desired cutting results.

-
Safety Checks
Ensure that all safety features on the machine are in proper working condition. Verify that the laser emission is blocked or contained until you are ready to commence cutting.
-
Test Run or Sample Cut
Before proceeding with the full-cutting operation, consider running a test or sample cut on a small area of the material. This allows you to verify the cutting parameters, focus, and alignment.
-
Start Cutting Operation
1) Once you have confirmed all the necessary settings and acquired satisfactory test results, start the CNC laser cutting process according to the programmed instructions.
2) Monitor the cutting operation periodically to ensure quality and make any necessary adjustments if required.
4. Set Up Laser Parameters:
This is a very crucial step on how to operate CNC laser cutting machines. To set up laser parameters for operating a CNC laser cutting machine, follow these steps:
-
Laser Power
1) Determine the appropriate laser power level based on the material being cut.
2) The power level should be high enough to melt or vaporize the material without causing excessive burning but not so high that it damages the material or affects the cut quality.
-
Cutting Speed
1) Set the cutting speed, which determines the rate at which the laser moves along the cutting path.
2) The speed should be chosen considering the thickness and type of material, as well as the desired precision and cut quality.
3) Higher cutting speeds may be suitable for thinner materials, while slower speeds might be necessary for thicker or more intricate cuts.
-
Focus Position
1) Adjust the focus position of the laser beam to achieve the best cutting results.
2) The focal point of the laser beam should be precisely positioned within the material to ensure efficient cutting.
3) This can be done manually by adjusting the focus lens or using an autofocus system, if available on your CNC laser cutting machine.

-
Assist Gas Selection and Pressure
1) Depending on the material, you may need to use an assist gas to improve the cutting process.
2) Common assist gases include compressed air, nitrogen, oxygen, or a mixture of gases.
3) The choice of assist gas often depends on the material type and thickness.
-
Kerf Compensation
Adjust the laser parameters to account for the kerf, which refers to the width of the material removed during cutting. Compensation is necessary to ensure dimensional accuracy in the final cut. The amount of kerf can vary based on factors such as material type and thickness, laser power, and cutting speed.
5. Load Program or Design File:
To load a program or design file into a CNC laser cutting machine, follow these general steps:
-
Design or Obtain the File
1) Create or obtain the design file that you want to cut using computer-aided design (CAD) software or other design programs.
2) Ensure that the file is compatible with the CNC laser cutting machine’s software and file formats. Common file formats include DXF, DWG, AI, SVG, and PLT.
-
Prepare the File for Transfer
1) Make sure the design file is saved in a location that can be easily accessed by the CNC laser cutting machine.
2) If necessary, organize the file in a suitable folder or format for efficient handling.
-
Connect to the CNC Laser Cutting Machine
Connect your computer to the CNC laser cutting machine using an appropriate interface, such as USB, Ethernet, or a network connection.

-
Select and Load the File
1) Use the file browser within the control software to navigate to the location where the design file is stored.
2) Select the file you want to load and confirm your selection.
3) The software will typically display the loaded file on the screen to allow for previewing or adjustment before cutting.
-
Set Cutting Parameters (if necessary)
If the laser cutting machine allows for parameter adjustment, review and set the appropriate cutting parameters such as power, speed, focus position, and assist gas settings.
-
Start the Cutting Process
Once you are satisfied with the program and settings, initiate the cutting process by pressing the appropriate command within the control software. Monitor the progress of the cutting operation and ensure that the machine operates smoothly and accurately.
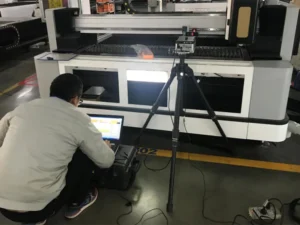
6. Machine Calibration:
Calibrating a CNC laser cutting machine is a crucial step to ensure accurate and precise cutting. The calibration process may vary depending on the specific machine model and manufacturer.
However, here are some general steps that are typically involved in calibrating a CNC laser-cutting machine:
-
Power on the Machine
Ensure that the CNC laser cutting machine is properly powered on and all safety precautions are followed.
-
Check Laser Alignment
Verify that the laser beam is properly aligned with the focusing lens. This step involves adjusting the mirrors and beam delivery system to ensure the laser beam is accurately delivered to the cutting head.
-
Check Beam Quality
Examine the beam quality to ensure its stability, shape, and intensity. The laser beam should be a consistent and smooth shape without any irregularities.
-
Measure and Adjust Focus
Proper focus is crucial for achieving precise cuts. Use a focus gauge or a measuring tool provided by the machine manufacturer to determine the correct focal length. Adjust the z-axis or the focus position accordingly to achieve the optimal focus.
-
Verify Cutting Accuracy
Perform test cuts on scrap materials to evaluate the cutting accuracy. These test cuts should consist of various shapes and sizes to assess the machine’s ability to accurately follow the programmed paths.
-
Measure Cut Dimensions
Measure the cut dimensions of the test pieces using calipers or other measuring tools. Compare the measured dimensions with the programmed dimensions to identify any discrepancies.
-
Make Calibration Adjustments
If the test cuts show deviations from the intended dimensions, make appropriate adjustments in the machine’s calibration settings. This may involve modifying parameters like cutting speed, power, focal length, or feed rate.
7. Start the Cutting Process:
Operating a CNC laser cutting machine to start the cutting process involves several steps.
Here’s a general outline of the process:
-
Material Preparation
Ensure that the material you want to cut is securely placed and properly aligned on the machine’s working surface or work table. Use clamps or fixtures if necessary to hold the material in place.
-
Set Up the Cutting Program
Use the CNC control software or the machine’s operator interface to load the cutting program. This program should contain specific cutting parameters such as cut path, cutting speed, power, and other relevant settings for your desired cut.
-
Set Laser Parameters
Verify and adjust the laser parameters based on the material you’re cutting. These parameters typically include laser power, pulse frequency, assist gas pressure, and focal length.

-
Positioning
Use the machine’s control system or manual controls to position the laser head at the starting point of the cut. Ensure that the laser head is at a suitable distance from the material surface to maintain proper focus.
-
Set Piercing Parameters
For thicker materials, the laser may need to pierce through the material before starting the actual cut. Set the appropriate piercing parameters, such as time and power, to ensure a clean and precise piercing process.
-
Start the Cutting Process
Once all the preparations are complete, initiate the cutting process by pressing the appropriate button or command on the machine interface. The machine will begin following the programmed cut path while the laser beam cuts through the material.
-
Monitor the Cutting Process
During the cutting process, closely monitor the machine’s operation, especially in the initial stages, to confirm that the cut is progressing as expected. Keep an eye on factors such as cutting speed, power, and material interaction with the laser.
8. Post-Processing:
After the cutting process is complete, there are several post-processing steps you can take to enhance the final product.
Here are some common post-processing operations for CNC laser-cutting machines:
-
Clean the Cut Parts
Remove any debris, slag, or dust generated during the cutting process from the cut parts. You can use compressed air, brushes, or other suitable cleaning methods to ensure the parts are clean and free from any loose particles.
-
Deburring
If sharp edges or burrs are present on the cut parts, you can use deburring tools, files, or sandpaper to smooth out those edges. This step helps to improve the appearance and safety of the cut parts.
-
Surface Finishing
Depending on the desired finish, you may need to perform additional surface treatments on the cut parts. This could include processes like sanding, grinding, polishing, or applying coatings such as paint or powder coating.
-
Quality Inspection
Before using or shipping the cut parts, it’s essential to perform a thorough quality inspection. Check the dimensions, tolerances, and overall quality of the parts to ensure they meet your specifications and requirements.
-
Sorting and Assembly
If you have multiple cut parts that need to be assembled, sort and organize them accordingly. Ensure that all necessary components are present and fit together correctly before proceeding with assembly.
-
Packaging and Shipping
Once the post-processing steps are complete, package the cut parts securely to protect them during transportation. Use appropriate packaging materials and methods to prevent any damage or scratches.
Additionally, always follow safety precautions during post-processing, such as wearing appropriate PPE, using tools and equipment correctly, and following safe handling procedures for the cut parts.
9. Shut Down the Machine:
How to operate CNC laser cutting machine? This is the last step. To properly shut down a CNC laser cutting machine, follow these steps:
-
Finish the Cutting Job
Ensure that the current cutting job is completed or paused at a safe point. Allow the machine to finish cutting and return to its home position, if applicable.
-
Turn Off the Laser Beam
Depending on the specific type of CNC laser cutting machine you are operating, you may have a dedicated laser control panel or software interface. Use this interface to turn off the laser beam. This step is crucial to prevent any accidental laser firing during the shutdown process.
-
Stop the Machine’s Motion
Bring the machine to a complete stop by pressing the emergency stop button or using the machine control panel. This will halt all machine movements and prevent any unintended operation.
-
Cool Down the Laser
Depending on the laser cutting machine, there may be a cooldown process required after shutting down. Follow the manufacturer’s guidelines to allow the laser and related components to cool down properly. This helps in maintaining the lifespan and performance of the laser.
-
Turn Off the Machine’s Power
Locate the main power switch or disconnect the switch for the machine. Flip the switch to the off position to cut off the power supply to the machine.
-
Secure the Work Area
Clean up any debris, tools, or materials around the machine. Ensure that the work area is clear and organized for the next use.
-
Disconnect Auxiliary Equipment
If there are any auxiliary equipment or peripherals connected to the machine, such as ventilation systems or air compressors, make sure to turn them off and disconnect them properly.
-
Perform Routine Maintenance
Based on the manufacturer’s recommendations, perform routine maintenance tasks, such as cleaning filters, lubricating moving parts, or inspecting crucial components.